A simple utility that reads a Shotcut project file (.mlt), reads a subrip (.srt) subtitle
file that matches the video that will be exported from the project file, then creates a
second .mlt file that is a transparent video with the subtitles appearing at the relevant
times.
A simple utility to get a quick impression of what an image looks like after applying
one or more 3D LUTs (Look-Up Tables). 3D-LUTs have a file extension of '/cube'.
An HTML-based utility that creates SubRip SRT subtitles. These can be hardcode/burned into
the video itself e,g, by using the Subtitle MLT Generator described in Section 14.
An HTML-based utility that enables you to visualise graphically any keypresses that you make in the area at the top of the page.
Optionally, a PNG image with a transparent background can also be downloaded.
HTML files to generate fairly complex Greyscale Luminosity Masks for use e.g. with transitions.
Optionally, a PNG image can be downloaded.
0. Short Tutorial Videos
I have put several short tutorial videos on my YouTube channel.
Just click on the relevant image below:
1. SVG path animation
SVG files are Scalable Vector Graphics files that are XML files which can easily be manipulated with Javascript.
In particular the paths specified within the SVG file can be animated to make it appear that they are slowly
being drawn on the screen. The HTML file SVG_animation.html is such an example.
You can replace the <svg>....</svg> in the HTML with your own SVG file and easily tailor its animation
by modifting the parameters (see below). A tutorial on how to do this can be seen here:
SVG_animation_tutorial.mp4.
Play around with the parameters and please remember, PATHs are being animated; if you have objects like RECTANGLEs or ELLIPSEs
you must convert these to PATHs (e.g. using Inkscape - https://inkscape.org/) in order to animate them.
For those new to SVGs, Inkscape and/or OBS, have a look at the following useful Introductory videos:
To obtain the source (to edit in your SVG) click on the SVG_animation.html link above,
then Right-click on the webpage and choose "view source" and copy-paste this into
a text editor (such as notepad++) to edit in your own SGV file.
The parameters you can modify to alter the type of animation are:
 //                                                 =============================
//============================= You may change the value of the PARAMETERS below ============================
//                                                 =============================
  const animate_separately  =   true          ;  // true = animate paths consecutively, false = animate paths concurrently
  const drawn_out           =   true          ;  // true = first path and last path complete simultaneously.

  const particles           =   true          ;  // true = draw using "particles", false = draw using lines
  const particle_size       =       1         ;  // in the "user units" of the SVG e.g. px, cm, pt, inch etc...
  const stroke_start        =       0         ;  //  0 seconds before starting to animate the stroke
  const stroke_duration     =   12000         ;  // 12 seconds (6000 msecs) spent animating the stroke
  const   fill_start        =   12000         ;  // 12 seconds before starting to animate the fill
  let     fill_duration     =    2000         ;  //  2 seconds spent animating the fill

  const backgroundColor     =   'black'       ;  // Any CSS colour (see https://www.w3schools.com/colors/colors_names.asp)
  const use_original_colors =   false         ;  // true = use the colours in the SVG, false = use the colours below
  const stroke_colors       = [ 'red', 'green', 'blue', 'magenta', 'orange', 'teal' ];  // Any CSS colours
  const   fill_colors       = [ 'teal', 'red', 'green', 'blue', 'magenta', 'orange' ];
  const first_stroke        =   'yellow'      ;  // The stroke colour for the first path (it may be unique)
  const first_fill          =   '#aaa'        ;  // The   fill colour for the first path (it may be unique)

  const easing              =   'easeInOutQuad';  // The type of motion acceleration (see https://easings.net/)
/*
  easing value = one of the following:
    'linear', 'easeInQuad' , 'easeOutQuad' , 'easeInOutQuad' , 'easeInCubic', 'easeOutCubic', 'easeInOutCubic',
              'easeInQuart', 'easeOutQuart', 'easeInOutQuart', 'easeInQuint', 'easeOutQuint', 'easeInOutQuint'
*/

//                             ========================================================
//============================= You may change the VALUE of any of the PARAMETERS above ==============================
//                             ========================================================
2. Animating Routes on a Map
Several users of Shotcut have asked how they can create an animated route on a map. There are ways of doing this just using
Shotcut, which mainly involves using a chroma key filter with mask filters that are keyframed.
A good example of this has been provided by Shotcut forum member "Namna" here:
https://forum.shotcut.org/t/trace-an-animated-route-over-a-map/24366/3.
However, this can quite fiddly and complicated if the route crosses itself or partway reverses or changes direction drastically.
I have experimented with a different approach using SVGs (Scalable Vector Graphics). See "1. SVG Path Animation" above for
more information on SVGs - though that technique and this one are similar they are totally independent of each other, you don't
have to use one to use the other. Before going into detail on what to do it is worth looking at the finished result, so click
here for an animated tour around Cyprus. It is a bit on the "gaudy" side
as I have tried to include as many options as I could and the start times for each path is set to zero, whereas in reality each
path would wait for the previous path to complete first.
Here are the steps to produce this:
Obtain an image (jpeg/png) of the map, e.g. from Google Maps, or OpenStreetMap.org, but be sure to follow their guidelines
concerning copyright and fair use etc.
Open your favourite SVG editor (I use Inkscape, but Illustrator, or any of the others e.g.
https://boxy-svg.com/ will do), and import your map image.
There are 2 ways of importing an image, one is called "Linking", where the SVG that is created will have an <image>
element with a reference to the (relative) location of the file e.g.
While embedding greatly inflates the size of your SVG, it means that the SVG can be used "standalone" almost anywhere, whereas linking
means that the image file (my_map.png) must always be available on the system in the same position in the filesystem relative to the SVG
itself. Also, if you were to create an HTML file with the SVG in it. e.g. as the source of an <img> element, the HTML file would have
to reside in the same directory/folder as the SVG itself, unless you edited the filepath.
Not all editors offer both methods. My utility can handle both types of import.
Using the "Freehand Drawing" tool (or the Bezier Curve tool or similar) trace over the route on the map. If you want to have several paths, e.g. splitting
the route at points along it, just draw several traces, or use the editor's "Split Path" tool.
Once you are happy with the traces (e.g. their smoothness, colour, width etc.) export the result as an SVG file, e.g. "Tour_of_Cyprus.svg".
Don't worry too much about the colour or width of the traces (or "paths") as you can change these later.
Open my
click on the button near the top that says:
"Load the SVG" and play around with the options until you are happy with the result. For each individual path/trace you can change:
whether it is visible or not
how thick it is
what colour it is
how opaque it is
whether is is animated or not
when the animation starts
the duration of the animation
whether an icon or text is animated to travel along the path
You can restart the animation at any time by clicking the "Restart the Animation" button.
When you are happy with the animation click the "Create New (Animated) SVG" button. This will bring up a "Textarea" element that has all
the text for the new animated SVG. The utility inserts SMIL
(Simultaneous Multimedia Integration Language)
instructions inside the SVG itself and as such when you display that SVG in (most) browsers it animates automatically. Just left-click on the
text to select it and then Copy-Paste it into a simple text editor, like Notepad++, and save it as an SVG file
e.g. Animated_Tour_of_Cyprus.svg. You may click (or right-click) on that link
to download the SVG itself and use that to familiarise yourself with the utility.
If after saving the SVG you realised you made a mistake, or want to change some part of the animation, just open my utility afresh and
select the animated SVG as the one you wish to open.
You can simply open the SVG in browser window and it will fill the window and perform the animation. You can use a screen recorder
like Sharex to record this to a video file and use this as a clip within Shotcut. Rather than use Sharex, I used OBS to record the animation
as a "browser source". To use the browser source feature I created the simple HTML file shown below (please note the specification of "utf-8"
is very important:
<html>
  <head>
    <meta charset="utf-8">
    <style>
      body {display: flex; flex-direction: column; align-items: center; justify-content: center;}
      svg  {width: 1080px; height: auto;}
    </style>
  </head>
  <body>
           REPLACE  THIS TEXT WITH YOUR <svg>....</svg>
  </body>
</html>
The utility is fairly intuitive. Hovering over the title of a column will bring up a tool-tip explaining about that column.
You can use "Drag & Drop" on the elements/cells in the first column to move a path upwards or downwards. This makes it
easier sometimes when altering the "Start" and "Duration" cells to link paths sequentially.
3. Animated Text Strokes (without needing to use an SVG editor)
Animating text strokes, such as is shown in these two videos is a special case of the technique used in Section 1 (SVG path animation) above.
Some people feel a bit intimidated using SVG editors like Inkscape or Illustrator. To ensure that because of this these people don't miss out on
using my path animation utility I have come up with a simpler procedure for animating text that does not require using an SVG editor.
There is simple web-base utility that enables you to input a line of text, choose a Google Font to display it and decide whether
to view the characters separately or as a continuous string. You are presented with the SVG representing this, which you can
then copy-paste into the following HTML (replacing the <svg>...</svg> element in it). Then you can simply view this HTML
file in a browser (or as a browser source in OBS) and use a screen recorder to create a video clip that you can use in Shotcut.
There are quite a few parameters near the top of the HTML (See Section 1 above) that you can modify to change the behaviour of the
animation. Try different combinations to see which suits your requirements best. Two new parameters have been added.
path_length_multiplier - this provides a workaround for SVGs produced with this new utility. Basically I need to discover the length of each
path but for some of the letters the system returns a length that is between 2 and 3 times too small. This parameter is a workaround for the
problem. So if you experience problems when using solid lines (it does not really affect particles so much), just try experimenting with
different values for this parameter.
path_width_multiplier - The web-based utility creates SVGs with a "path-width" of 0.25mm for the paths.
This is usually too narrow to give a good effect, which is where this parameter comes in. Again, experiment with it to get the result you want.
The instructions for creating text animation effects such as those shown in the videos above are:
Open in a text editor such as Notepad++ one of the two HTML files used to produce the animated videos above. The idea is to replace the
<svg>...</svg> element with one that you are now going to create. The two html files for downloading are:
.
Go to the following website and create your SVG by typing the text choosing the Google font, font-variant and font-size, as well as
whether or not you want seperate characters (each character has its own path).
https://danmarshall.github.io/google-font-to-svg-path/
You can preview Google fonts by going to:
https://fonts.google.com/.
The SVG source will appear in the textarea at the bottom of the webpage. Highlight the text and copy-paste it into the file in the
text editor replacing the <svg>...</svg> element that is already there. Save the changed HTML file.
Run the HTML file in a browser and take a screen recording, e.g. using Sharex, or run it as a browser source in OBS and make a
video recording that you can edit as a clip in Shotcut.
4. Heartbeat
Several users of Shotcut have asked how they can simulate a heartbeat, or electrocardiogram graph. The easiest way is to
obtain a clip from the web and use that. I generated two such clips:
one (ECG_Heartbeat.mp4) a 1 MB MP4 file showing the ECG as a green trace on a black background
the other (ECG_Heartbeat.mov) a 100 MB MOV file showing the ECG as a green trace on a transparent background
If you are interested in how I produced the videos I downloaded an actual ECG dataset from the web, wrote a javascript program
to massage the data and display it in an HTML canvas and then added some CSS animation. I then played it as a “browser source”
in OBS and recorded it. I then fed it into shotcut, tidied it up and created the 2 videos.
N.B. The flatlining at the end is my invention, the patient being monitored did not die. Feel free to use them in your projects.
5. 3D-Animation of the Shotcut Logo
I created an HTML/CSS file to show how easy it is to produce very acceptable 3-D animations using this technology. Here is the result:
The HTML file was run as a browser source in OBS studio, which recorded the animation. This video was then tidied up within Shotcut.
It required 3 images:
6. Creating a lower-thirds banner effect as seen on videos and TV programs
CSS animations lead themselves quite well to creating reasonably sophisticated "low-third" effects, such as are
shown in the sample video above. There are some who are not confident at creating the HTML files needed to do
this, so I have created a simple utility that people can use to do this. Initially the utility will only create
the type of effect shown above, but I may extend it to other animations. The utility enables the user to tailor
the various parameters needed to create the effect in a simple way. It creates the HTML/CSS text needed to create
the effect which the user can then copy-paste into a file and run in a browser. Simply capturing the screen
(e.g. with the Sharex utility, or as a browser source in OBS Studio) while the browser displays the animation
enables you to save it as a video clip that you can then use in a video editor such as Shotcut, or you could
simply incorporate the HTML/CSS into your own webpage, to add some interactivity to it.
The icon that is used in the animation can be chosen from a set of over 1,600 free icons provided by those great people over
at
The licence for these free icons is very liberal and allows the icon set to be used for commercial projects,
open source projects, or really almost whatever you want. If you want to use something else you can do that also
e.g. you could use an emoji character.
My web application can be accessed by pressing here:
7. Creating a typewriter, or teletype effect
HTML/CSS/Javascript can easily be used to create a "typewriter" effect. For those who are not confident at creating the HTML
files needed to do this I have created a simple utility that people can use instead. The utility enables the user to tailor
the various parameters needed to create the effect in a simple way. It creates the HTML/CSS text needed to produce
the effect which the user can then copy-paste into a file and run in a browser. Simply capturing the screen
(e.g. with the Sharex utility, or as a browser source in OBS Studio) while the browser displays the animation
enables you to save it as a video clip that you can then use in a video editor such as Shotcut. Or you could
simply incorporate the HTML/CSS into your own webpage, to add some interactivity to it. Or you could use a previous version
of Shotcut e.g. version 20.07.11 that supports the "Text:HTML" filter. If you do use this filter do not forget to select
the option "Use WebVfx Javascript Extension".
If you want to create an effect that is overlaid on top of
another video clip then be aware that, because of the way the effect is created, you cannot have a transparent
background, so you will have to use a "green screen" technique. e.g. if your text is white (#ffffff), choose a black (#000000)
background (or vice versa) and use the "chroma key" filter to turn the background transparent.
The animation itself relies on the free GSAP javascript animation library, see here
https://greensock.com/standard-license/
to check out the licence, which is very liberal. The HTML file produced loads this file from the internet, so it should
go without saying that you need an internet connection when you run that HTML file.
N.B. For the animation to work you need to be connected to the internet and must also have downloaded the following
two Javascript files and saved them in the same directory/folder as the HTML file you create. These files are:
The web application can be accessed by pressing here:
8. Creating a Revealing Title
I have created a simple utility that enables the user to tailor
the various parameters needed to create a "Title Reveal" effect in a simple way. It creates the HTML/CSS text needed to produce
the effect which the user can then copy-paste into a file and run in a browser. Simply capturing the screen
(e.g. with the Sharex utility, or as a browser source in OBS Studio) while the browser displays the animation
enables you to save it as a video clip that you can then use in a video editor such as Shotcut. Or you could
simply incorporate the HTML/CSS into your own webpage, to add some interactivity to it. Or you could use a previous version
of Shotcut e.g. version 20.07.11 that supports the "Text:HTML" filter. If you do use this filter do not forget to select
the option "Use WebVfx Javascript Extension".
The animation itself relies on the free GSAP javascript animation library, see here
https://greensock.com/standard-license/
to check out the licence, which is very liberal. The HTML file produced loads this file from the internet, so it should
go without saying that you need an internet connection when you run that HTML file.
N.B. For the animation to work you need to be connected to the internet and must also have downloaded the following
two Javascript files and saved them in the same directory/folder as the HTML file you create. These files are:
The web application can be accessed by pressing here:
9. Creating a Pseudo-Morphing affect
I have created a simple utility that enables the user to tailor
the various parameters needed to create a "Pseudo-Morphing" effect in a simple way. It creates the HTML/CSS text needed to produce
the effect which the user can then copy-paste into a file and run in a browser. Simply capturing the screen
(e.g. with the Sharex utility, or as a browser source in OBS Studio) while the browser displays the animation
enables you to save it as a video clip that you can then use in a video editor such as Shotcut. Or you could
simply incorporate the HTML/CSS into your own webpage, to add some interactivity to it. Or you could use a previous version
of Shotcut e.g. version 20.07.11 that supports the "Text:HTML" filter. If you do use this filter do not forget to select
the option "Use WebVfx Javascript Extension".
The animation itself relies on the free GSAP javascript animation library, see here
https://greensock.com/standard-license/
to check out the licence, which is very liberal. The HTML file produced loads this file from the internet, so it should
go without saying that you need an internet connection when you run that HTML file.
N.B. For the animation to work you need to be connected to the internet and must also have downloaded the following
two Javascript files and saved them in the same directory/folder as the HTML file you create. These files are:
The web application can be accessed by pressing here:
10. MLT (Project File) Analyser
A simple utility that analyses a Shotcut project file (.mlt). It tabulates:
PRODUCERS - mainly the input video, audio and image clips
FILTERS - as applied to these clips, tracks, or the output as a whole
TRANSITIONS - between clips
Please note that if you have media specified in a Playlist, then they too will be listed as "Producers", even if you do not use them
on the timeline. To only see media that has been used in the project you will need to make a copy of the project file (.mlt) and editthis to delete
all the entries in the Playlist. Ten feed this edited file into the analyzer.
The web application can be accessed by pressing here:
There is also a version that you can download and use offline. This version will download if you right-click on the following button
and choose to download/save the link:
11. Creating a Morphing affect for SVGs
I have created a simple utility that enables the user to tailor
various parameters needed to morph SVs in a simple way. It creates the HTML/CSS text needed to produce
the effect which the user can then copy-paste into a file and run in a browser. Simply capturing the screen
(e.g. with the Sharex utility, or as a browser source in OBS Studio) while the browser displays the animation
enables you to save it as a video clip that you can then use in a video editor such as Shotcut. Or you could
simply incorporate the HTML/CSS into your own webpage, to add some interactivity to it. You cannot use a previous version
of Shotcut e.g. version 20.07.11 that supports the "Text:HTML" filter. This is because the interpolation library used to
morph the SVG paths is not compatible with the webkit-browser used by the old versions of Shotcut.
There are some restrictions on the 2 SVGs, the SVG you are morphing from and the one you are morphing to. Firstly they each can
only contain a single path (<path>) containing a singe description (d="...."). Secondly, to get a reasonable morph the two
SVGs should have identical viewBoxes. If e.g. you were trying to morph the text "I ❤️" into "NY" using the Inkscape SVG editor
you would:
create a document say 250px wide by 100px;
use the TEXT tool to write "I❤️"
select Path->Combine
select Path->Object to Path
save the resulting SVG
You would perform the same actions for the text "NY". These SVGs are the ones you would select in the app.
The animation itself relies on the free GSAP javascript animation library, see here
https://greensock.com/standard-license/
to check out the licence, which is very liberal. The HTML file produced loads this file from the internet, so it should
go without saying that you need an internet connection when you run that HTML file.
N.B. For the animation to work you need to be connected to the internet and must also have downloaded the following
two Javascript files and saved them in the same directory/folder as the HTML file you create. These files are:
The web application can be accessed by pressing here:
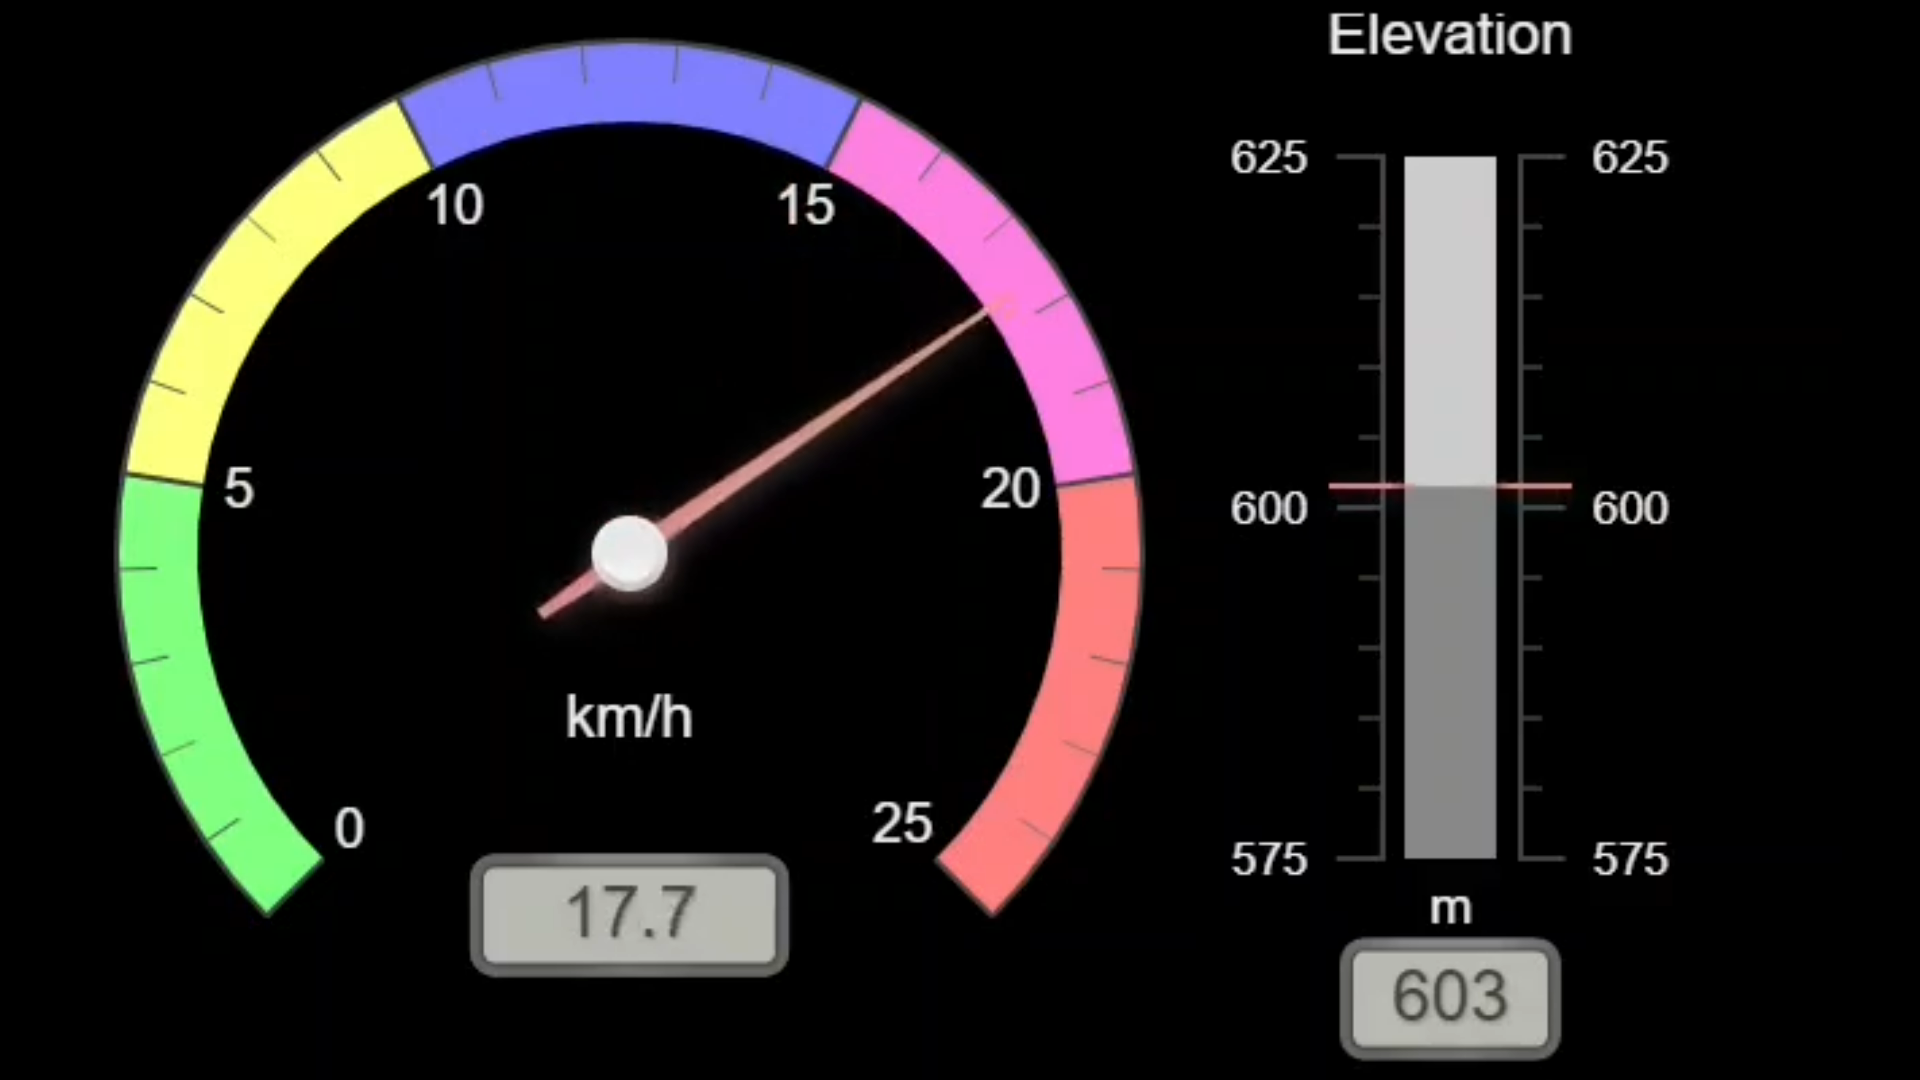
12. Animated Display of GPS Data as a Speedometer and Altimeter
GPS trackers, either dedicated hardware or software ones, such as the
BasicAirData Android app, create a file with
various data in it recording the route taken. If this is in GPX XML format and contains <speed> elements, then the HTML file that you can obtain
by clicking this button can be edited to contain the GPX data and run in a browser.
For the HTML file to work, the data must be in GPX XML format. If your data is in another format try using
gpsvisualizer.com to convert it, but the resulting data file must contain speed
information as <speed> elements. To get a copy of the HTML just right-click it in the browser window and choose "View Page Source", then select all the
text and copy it into a text editor.
The HTML file uses a javascript library, which can be downloaded here: canvas-gauges.com/download/
(click on the link saying "All-in-one"). It also uses jQuery, which it loads automatically from the web (or you could download it). You have to edit the HTML to replace the
GPX XML data that is there by your own GPX data. There are various options you can change such as the background-color (it is "black", but can be changed
e.e. to "white" or an HTMl colour such as "#7799BB").
If you use function key F12 to open (and later close) a console window while running the HTML in a browser you will see some useful information printed.
This shows the minimum and maximum values for speed and elevation, which will help you to configure the speedomiter and altimeter to your liking.
If you want to use this animation in Shotcut, e.g. as an overlay on top of a video shot while running/cycling/driving the route, one way would be
to record the animation e.g. as a browser-source in OBS Studio and create a video from it. You would then put it on a track and either have it as a small
"picture-in-picture" (using the Size-Position-Rotate filter), or make the background transparent by using the Chroma-Key filter. Another way would be to use an earlier version of Shotcut
such as v20.07.11 and run it as a Text:HTML filter. However to do this you would have to use the a different HTML file, notably
, along
with this javascript file
you will also need to select the option in the filter for using the WebVfx framework.
13. Display cues from a Subrip (.srt) file according to their timings.
Subrip (.srt) files are the most widely-used files for holding video subtitles. They can be stored in various video containers (such as MP4), or
can be separate files that are read by video players. I have provided a utility that can help users to create subtitles here:
.
I have also provided a fairly simple HTML file that users can download and tailor to their needs to display in a browser the subtitles that are
in the subrip file. To access it see the end of this section.
Besides displaying the subtitles in a browser window the HTML can also be used as a "browser source" in OBS Studio, which then enbles you to
record the subtitles to a video file. Another possibility, if you have a version of Shotcut that is 20.07.11 or earlier, which supports the
Text:HTML filter, you can use this HTML file as such a filter (selecting the option to "Use Webvfx Framework"). By changing the CSS code for
the <body>element to have "background-color: transparent", you can "burn" the subtitles directly onto your video.
You need to apply the filter to a transparent clip that is exactly the length og the "end" time for the last cue.
In the example below this is 30.000 seconds.
As I mentioned, the HTML file is fairly simple and it has a few options that can be changed. These are:
body  {background-color: #00ff00;}         /* <-- CONFIGURE Green Screen (OR "transparent" */
#cue  {background-color: rgba(0, 0, 0, 1); /* <-- CONFIGURE Black background               */
       color           : #ffffff;          /* <-- CONFIGURE White text                     */
       font-family     : Verdana, Arial, "Times New Roman"; /* <-- CONFIGURE the font-face */
       font-size       : 16px;             /* <-- CONFIGURE the font size                  */
       padding         : 8px;              /* <-- CONFIGURE the padding inside the box     */
       margin          : 8px;              /* <-- CONFIGURE the margin outside the box     */
      }
OBS Stdio does not support the alpha channel (opacity) when creating a video so you will have to use a "green screen" background colour,
the default is #00ff00 (i.e. Green), and remove this in Shotcut using the Chroma-Key filter.
You need to copy the contents of your subrip file to the HTML file, replacing the dummy version that is already there saying:
1
00:00:05,000 --> 00:00:08,000
FIRST SUBTITLE (5 - 8)

2
00:00:10,000 --> 00:00:13,000
SECOND SUBTITLE (10 - 13)
and its 2nd line

3
00:00:12,000 --> 00:00:15,000
THIRD SUBTITLE (12 - 15)

4
00:00:20,000 --> 00:00:33,000
FOURTH SUBTITLE (20 - 33)
and its 2nd line

5
00:00:25,000 --> 00:00:28,000
FIFTH SUBTITLE (25 - 28)

6
00:00:28,000 --> 00:00:30,000
SIXTH SUBTITLE (28 - 30)
Beware, the code does very little error checking, so if your subrip file has errors, such as the start times not incementing monotonically,
the results can be unpredictable. You may be able to correct the file using the utilities here:
subtitletools.com/
Finally: Only create the subrip file as the last action in creating the video.
If you create the subtitle file and then alter the video then the timings are liable to change and the subtitle file will not reflect
what is on the screen.
The HTML file can be downloaded by right-clicking this button:
, along
and saving the HTML link to a file.
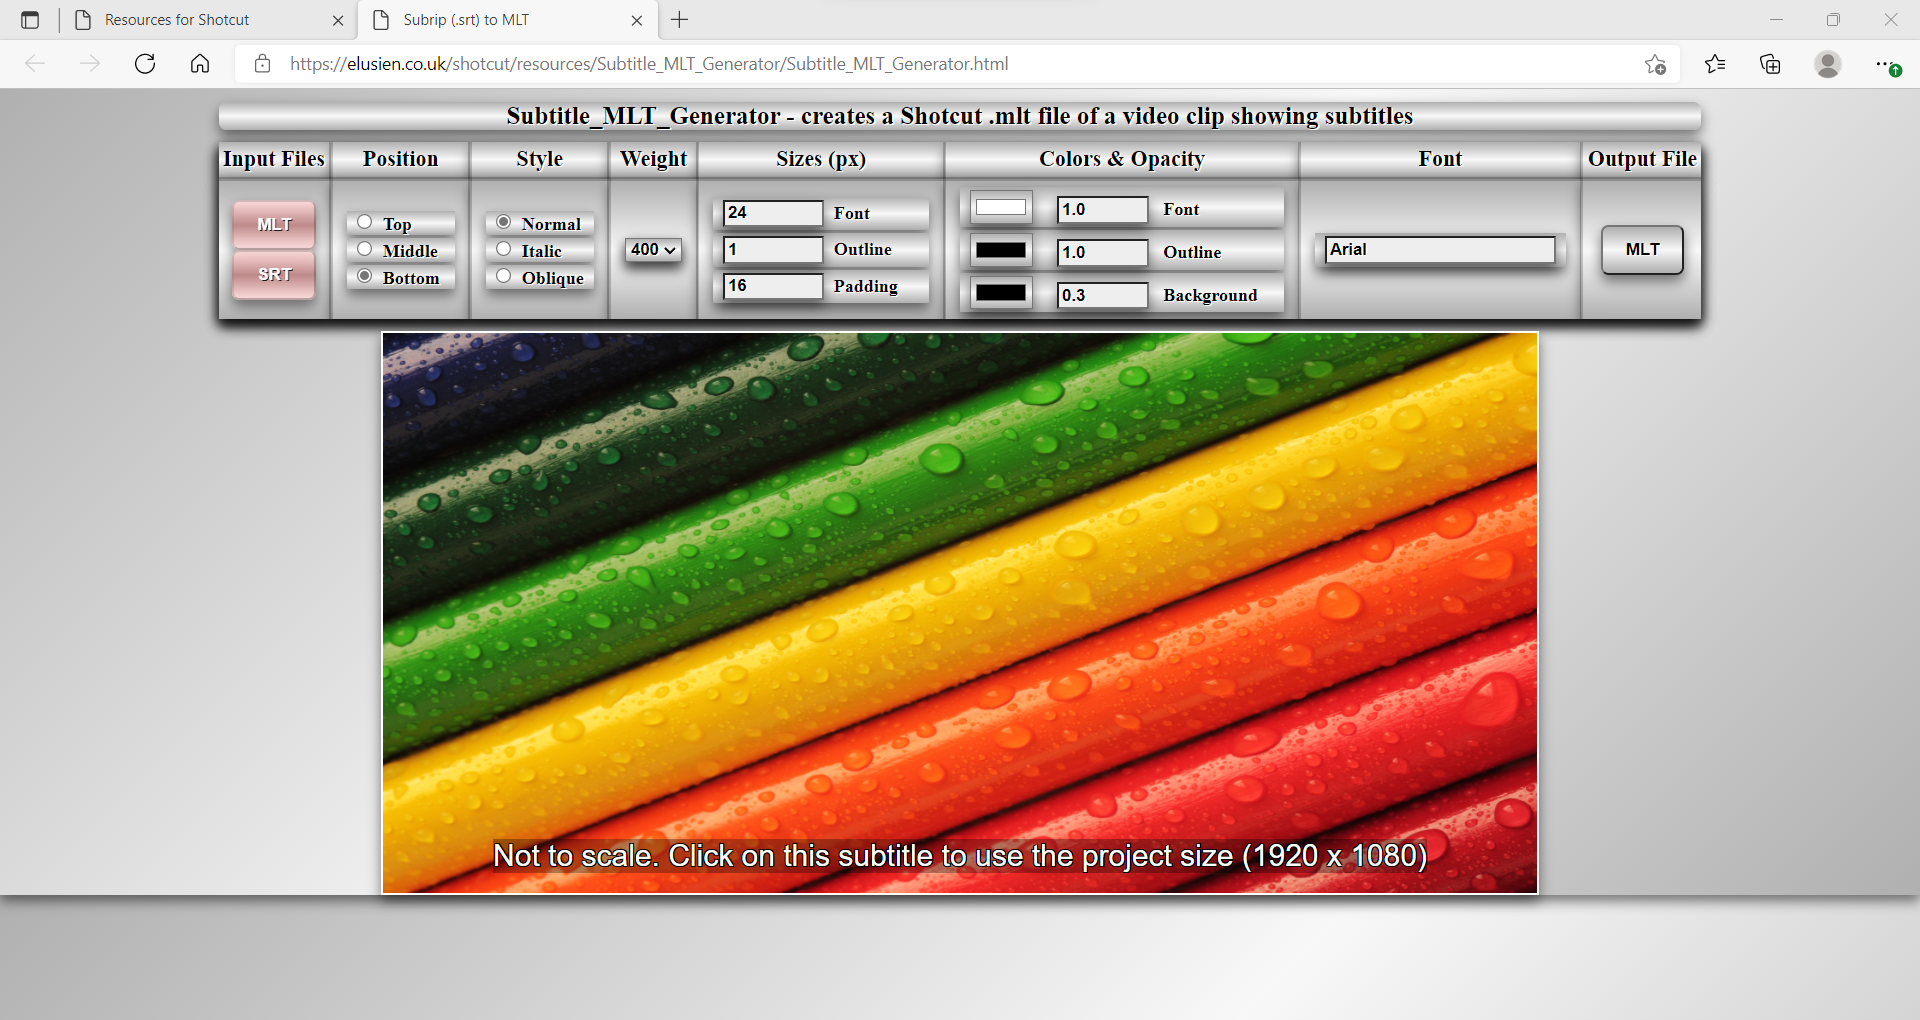
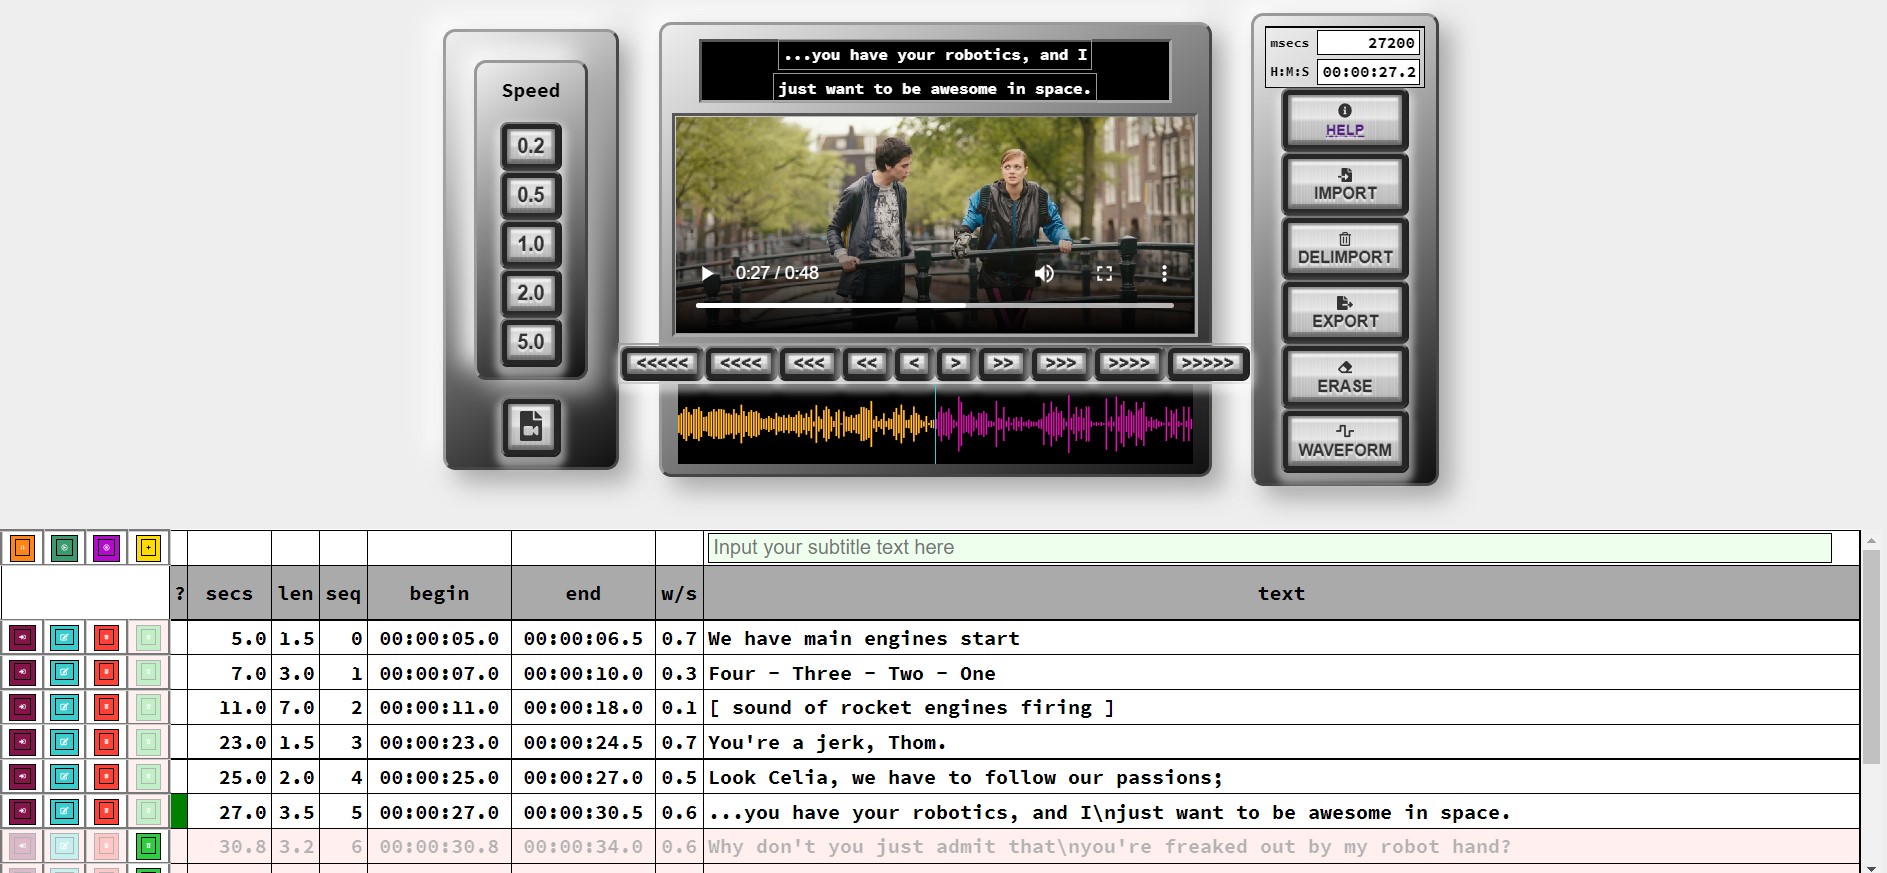
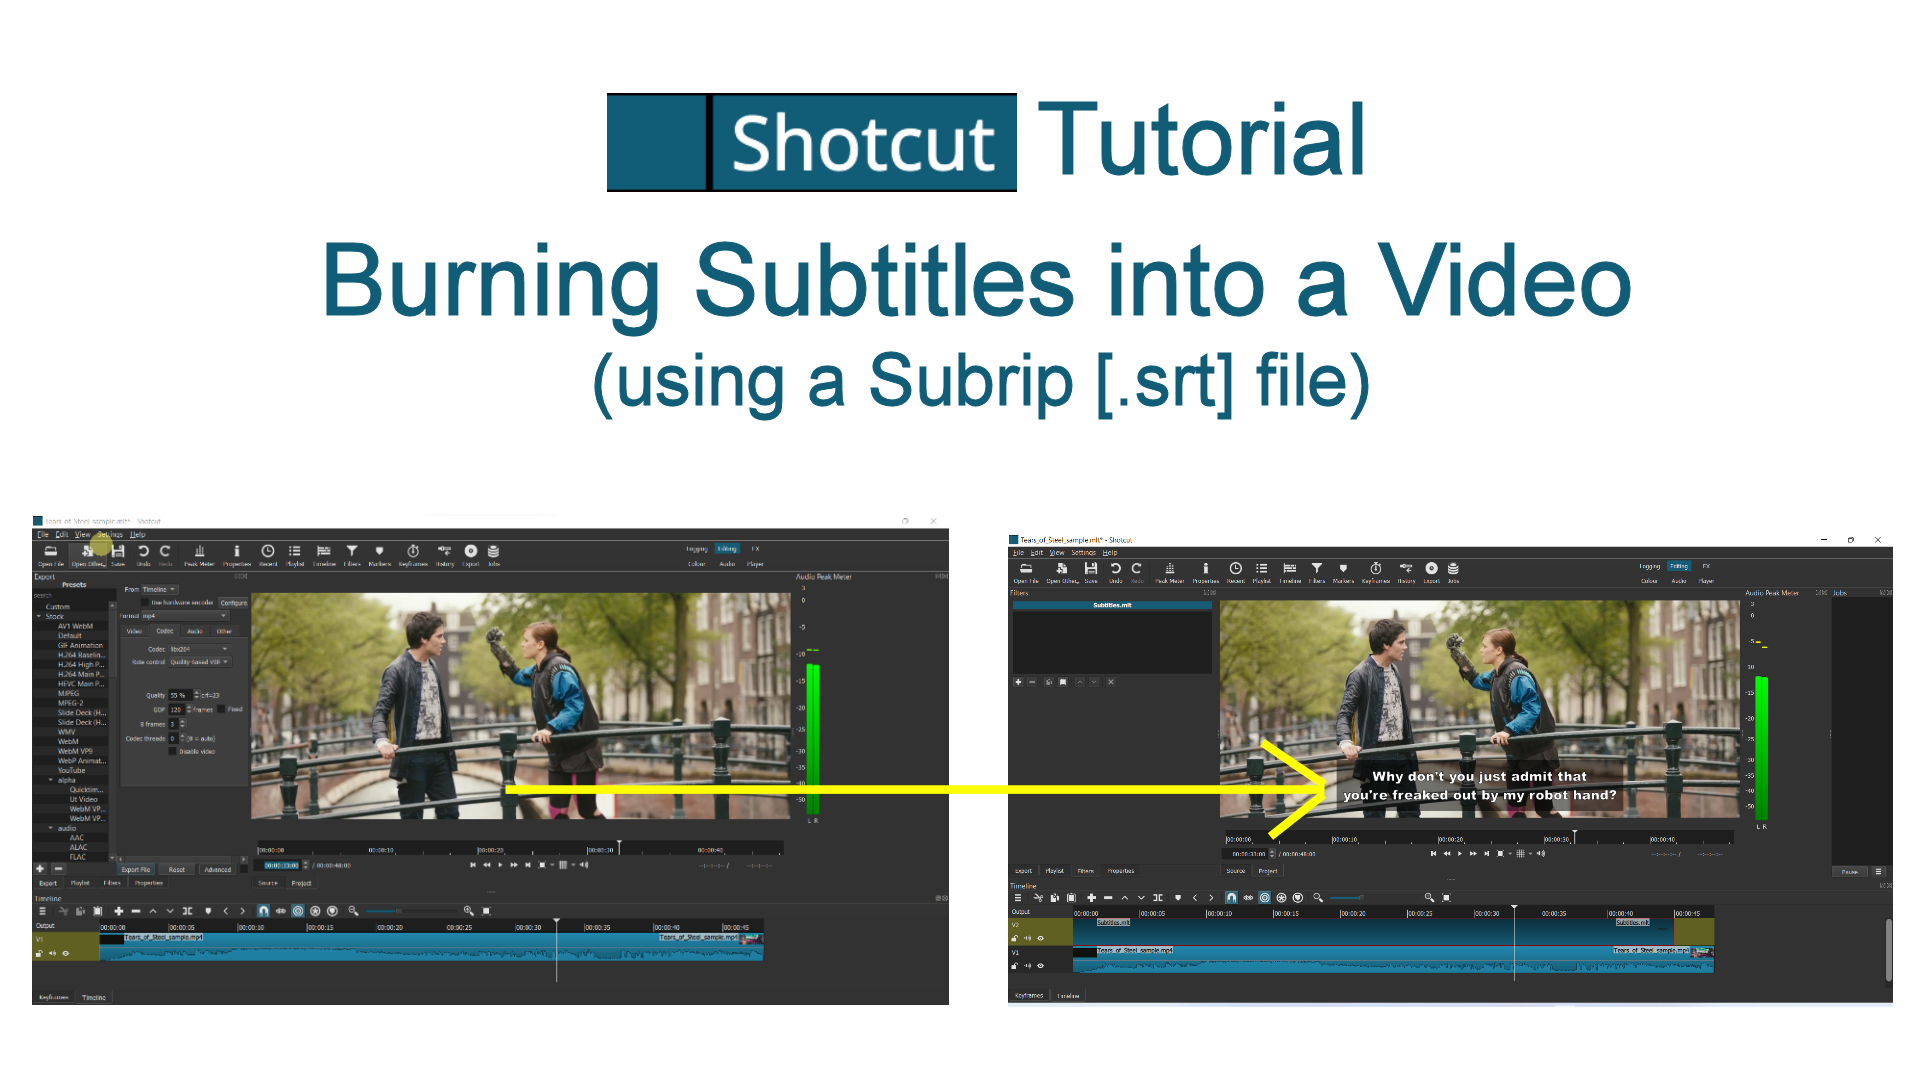
14. Subtitle MLT Generator
I have created a simple web utility that enables the user to create a Shotcut .mlt file that consists of
a transparent background and "Text:Simple" filters that display a set of subtitles at the
relevant times. The subtitles are read from a Subrip (.srt) subtitle file that is fed into the generator
along with the Shotcut project file of the video to which the subtitles refer. The resulting .mlt file
can be opened in the Shotcut project as a clip and placed on a new topmost track.
N.B. Unless you know what you are doing, the project should not be edited afterwards as any changes to the timings will mean that the
subtitles will probably appear at the wrong times. If you do edit the project afterwards, you may well
need to modify/re-create the Subrip file and then generate a new subtitle .mlt file. The subtitle MLT file is
downloaded by pressing the "Output File (MLT)" button.
The web application can be accessed by pressing here:
If you would like to run the generator locally, rather than over the internet, you can download the source
(e.g. Right-click in the generator window and select "View page source" and copy it to a file with a ".html"
extension) then just run that in a modern browser, no internet connection is then needed.
The steps to take are (usually):
The first step will probably be to finish your Shotcut project and export the complete video,
since the subrip generators usually require a video file in order to sync the subtitles.
This video is not actually needed for the app that creates the MLT file with the subtitles
in it.
Open the generator and first select the Shotcut project file, then select the Subrip file.
Tailor the subtitles (position, colours, font etc.) and download the generated MLT file.
Open the original project file in Shotcut and create a new topmost video track Ctrl+I.
Use the menu-item File->Open MLT XML As Clip and place this at the
beginning of the newly created track
Run the video to check that the subtitles are as you want them to be.
Export the final video and the subtitles will be burned into the relevant frames.
Don't forget, if you are uploading your video to YouTube, or Vimeo, you don't have to burn subtitles
into the video frames, these platforms allow you to upload subtitle files and their players enable
users optionally to request these subtitles be displayed.
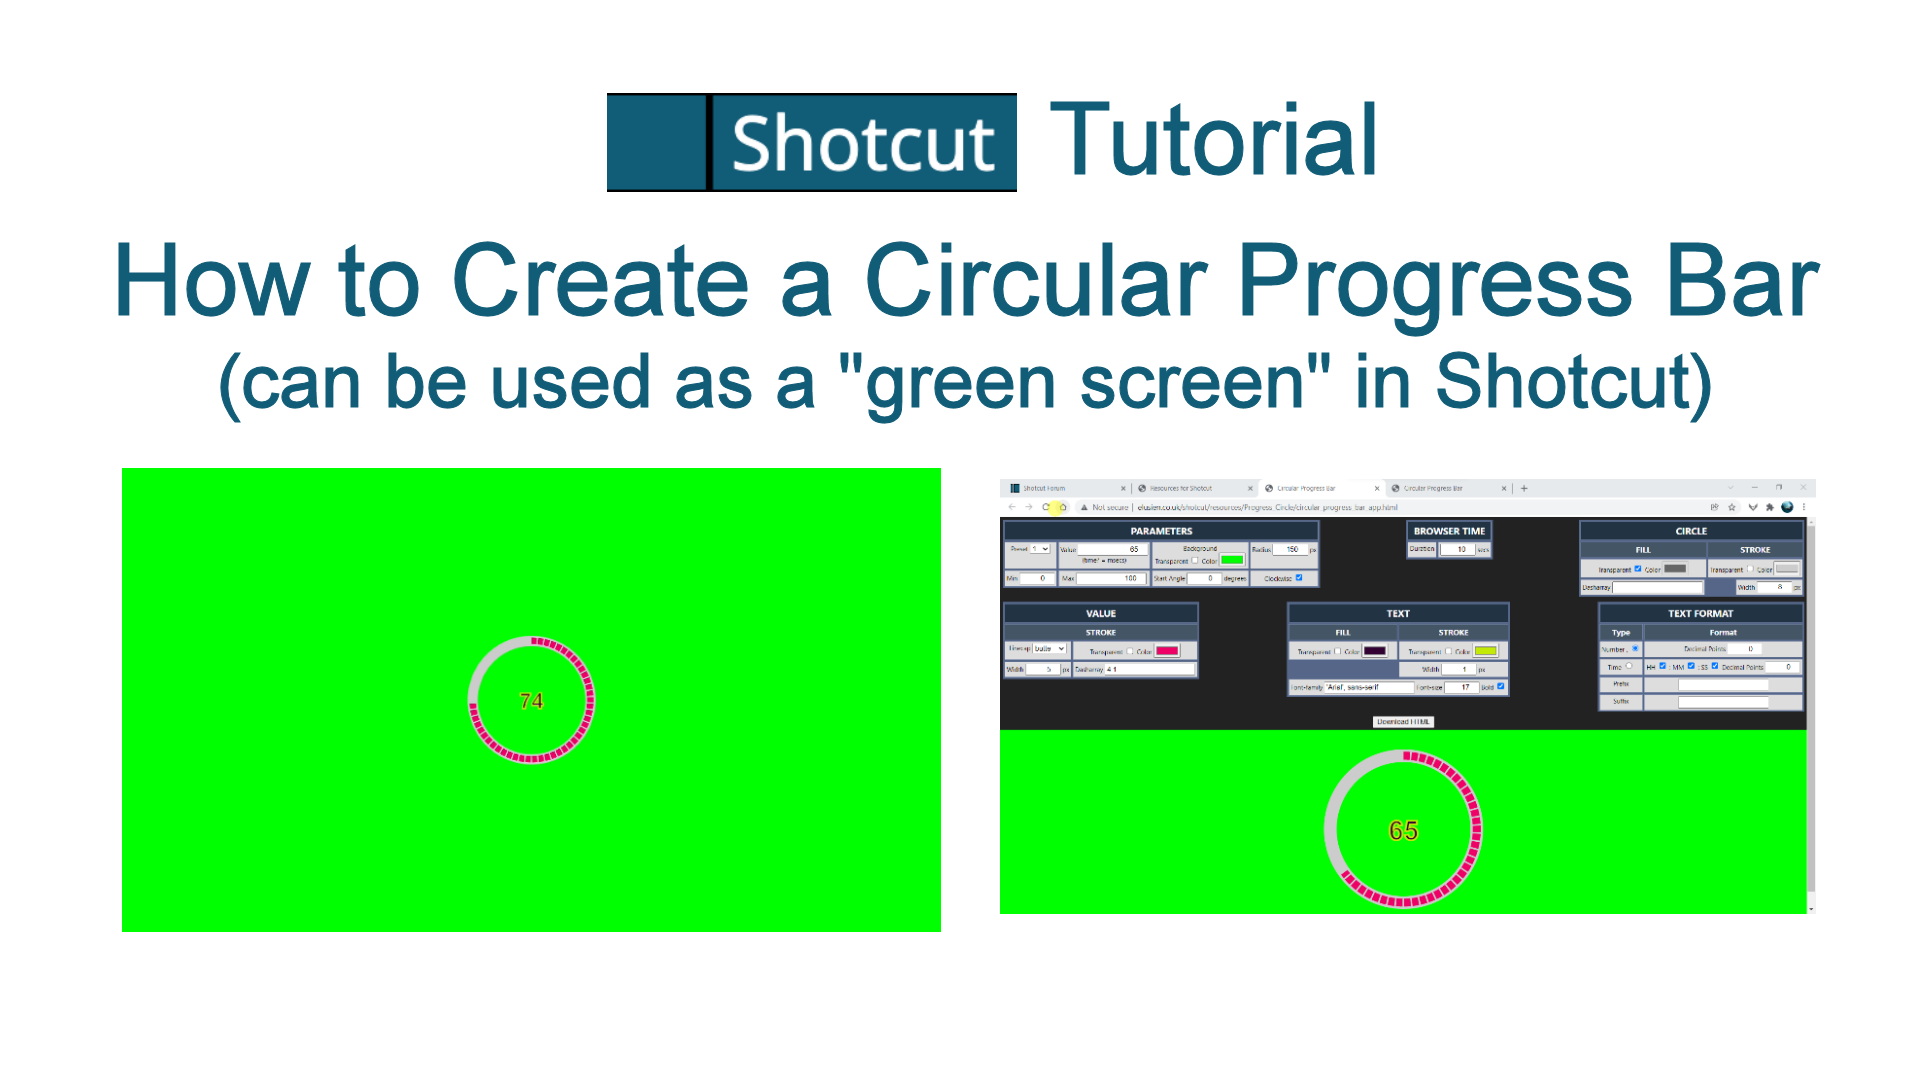
15. Progress Circle
I have created a simple utility that enables the user to tailor
the various parameters needed to create a "Progress Circle" effect in a simple way. It creates the HTML/CSS/Javascript text needed to produce
the effect which the user can then download and run in a browser. Simply capturing the screen
(e.g. with the Sharex utility, or as a browser source in OBS Studio) while the browser displays the animation
enables you to save it as a video clip that you can then use in a video editor such as Shotcut. Or you could
simply incorporate the HTML/CSS into your own webpage, to add some interactivity to it. A future plan is to enable you use a previous version
of Shotcut e.g. version 20.07.11 that supports the "Text:HTML" filter. If you do use this filter do not forget to select
the option "Use WebVfx Javascript Extension". See the following website for examples:
https://tigrr.github.io/circle-progress/examples.html.
Currently the utility itself relies on a free javascript library created by "Tigran", see here
https://github.com/tigrr/circle-progress.
You do not need to download this library as an inline copy is in the HTML file created.
The web application can be accessed by pressing here:
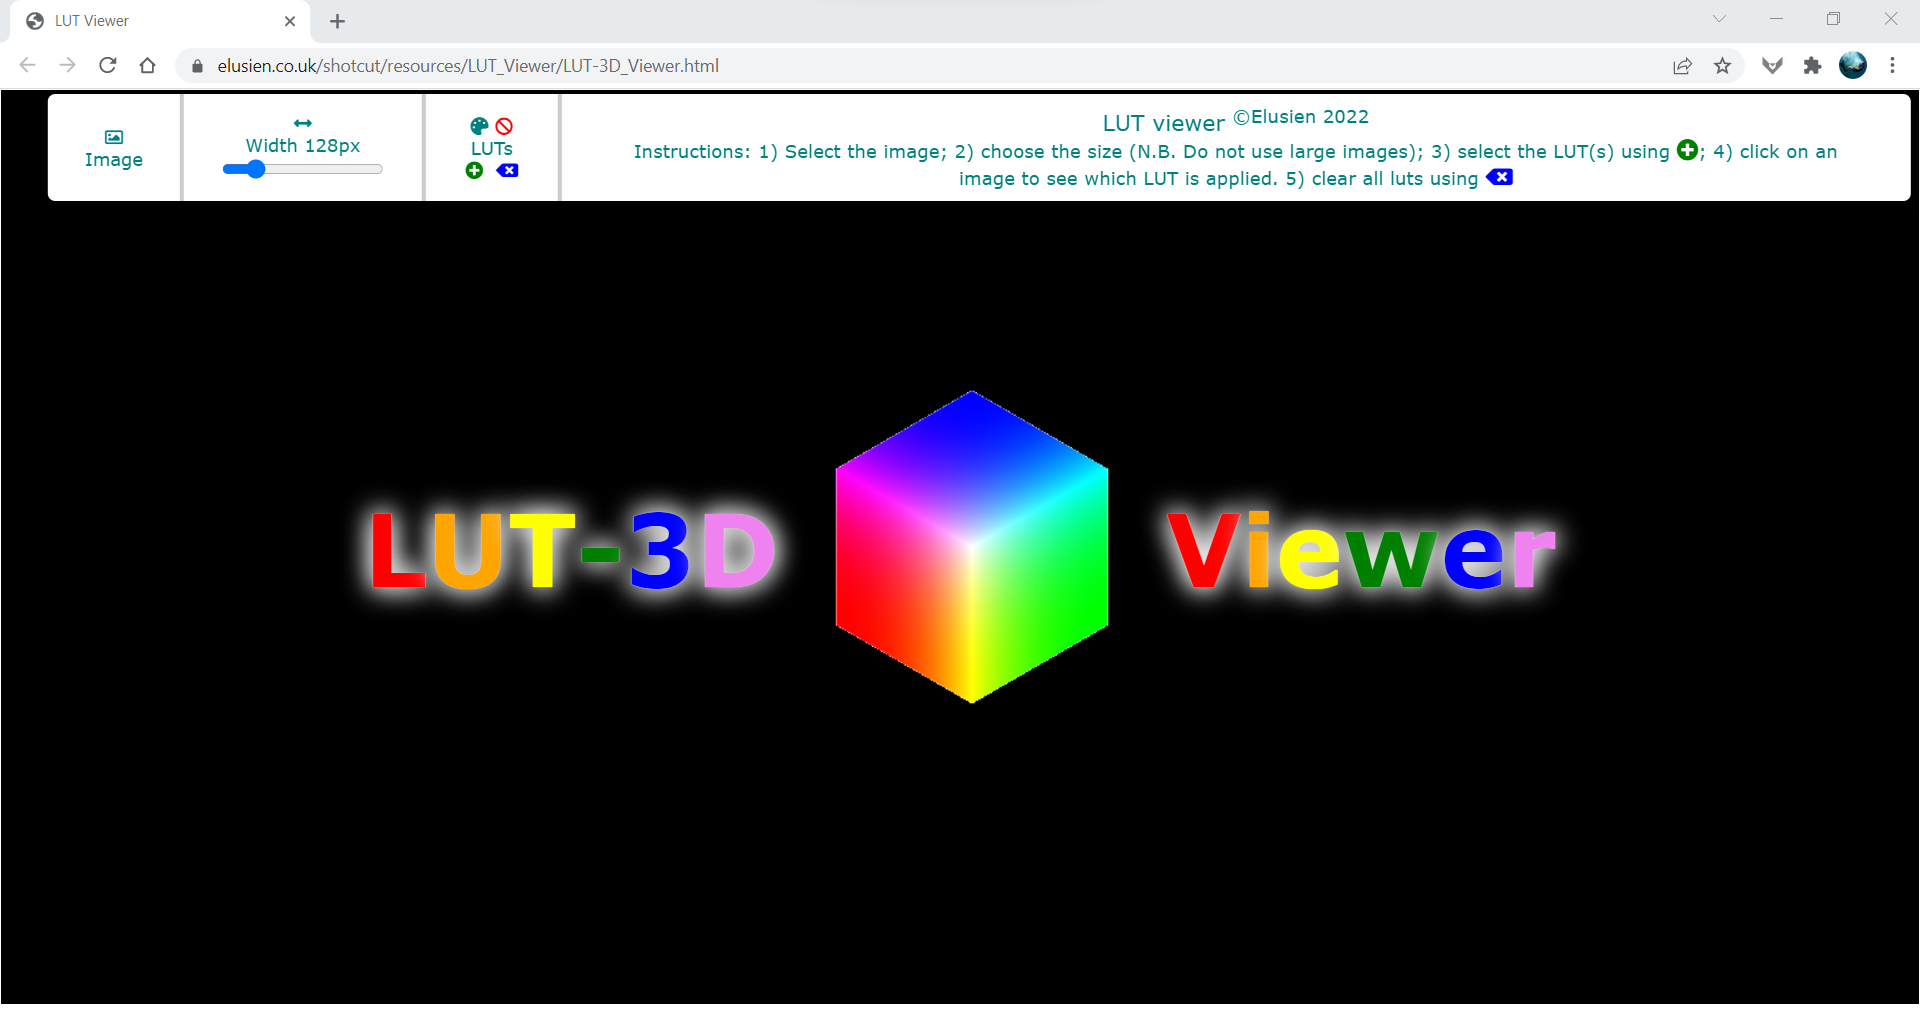
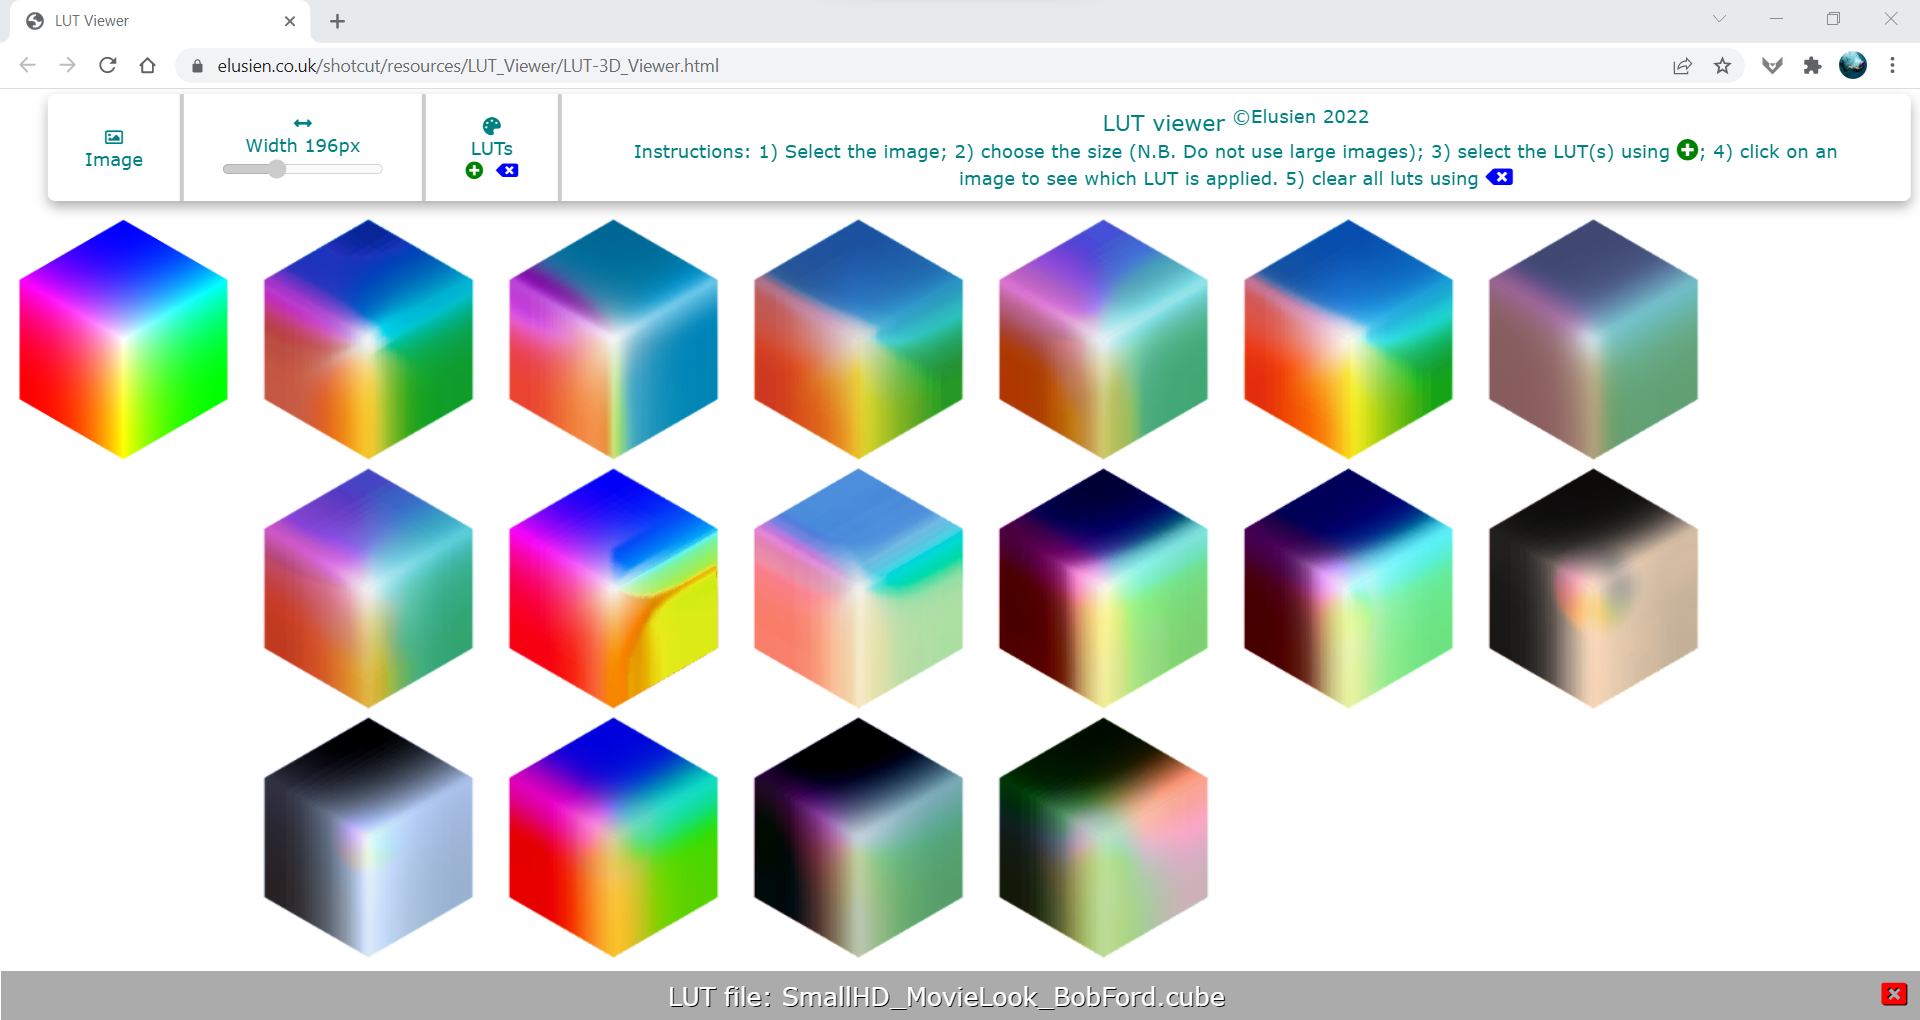
16. LUT-3D Viewer
I have created a simple utility that enables the user to get a quick impression of what an image looks like after applying
one or more 3D LUTs (Look-Up Tables). 3D-LUTs have a file extension of ".cube". It is not easy to
decide which LUT to use on a particulay image (or video) and rather than try each one out one at a time
this utility lets you see what effect many LUTs would have, all in one go.
The web application can be accessed by pressing here:
17. SubRip SRT Subtitles Generator
An HTML-based utility that creates SubRip SRT subtitles. These can be hardcode/burned into
the video itself e,g, by using the Subtitle MLT Generator described in Section 14.
Detailed information can be accessed by pressing here:
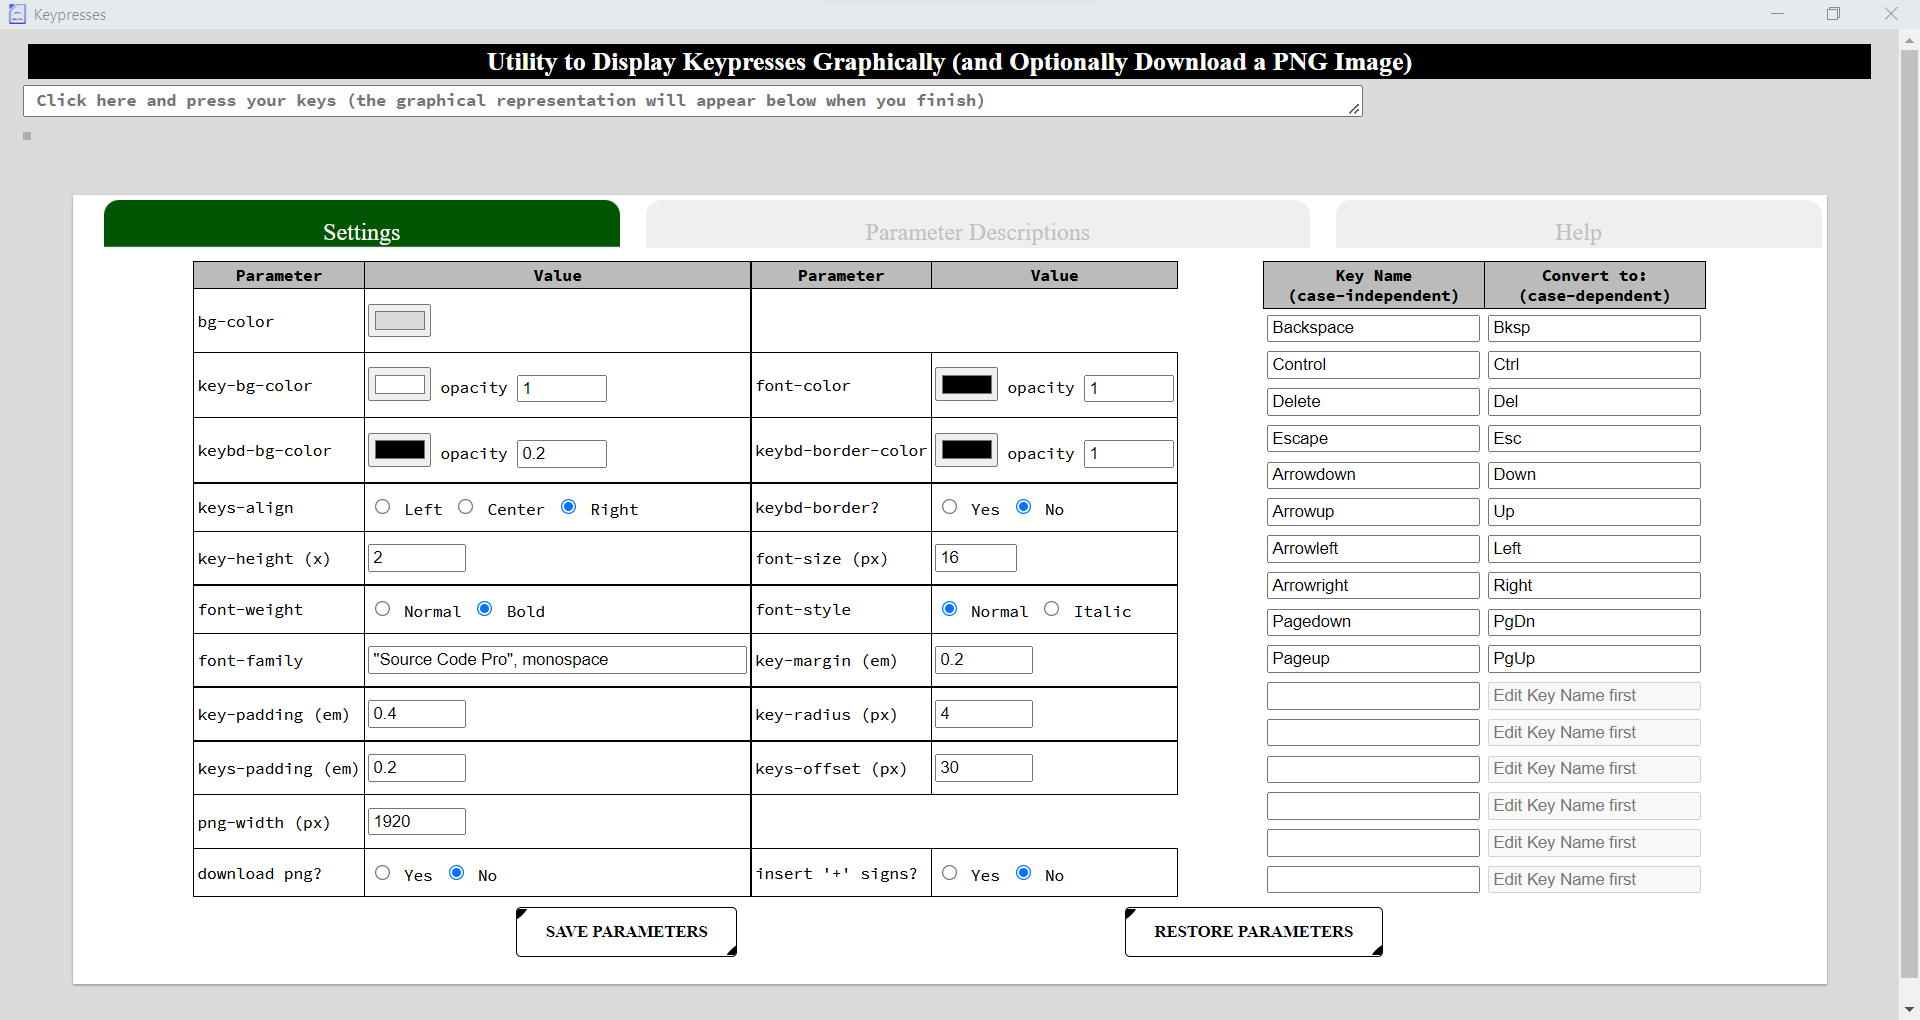
18. Keypresses Visualiser and PNG Image Creator
This utility enables you to visualise graphically any keypresses that you make in the area at the top of the page.
The visualisation is in the form of "keys" as you would see on a keyboard.
As you press a key it is remembered and once you lift your finger from the key
(or a set of keys such as ControlAltx) these keys are displayed.
Optionally, a PNG image with a transparent background is also downloaded at this point.
The image is useful if e.g. you are making a tutorial video with a video editor such as Shotcut and want edit in the keypresses so they appear on
the screen.
Please be aware that the keys displayed may not be exactly what you expect. For example: on my keyboard the asterix "*" is on the same
key as the number "8" character - If I press Shift8, what will appear in this utility will be Shift*,
NOT *, nor Shift8. This is because as soon as you press Shift, the system passes that to the utility and as soon as
you press 8 the system passes whatever is produced when the number"8" key is pressed in conjuction with "Shift", which is "*".
Some keyboards use the Alt and Control keys as well as the Shift key to modify what character is produced.
e.g. AltControlm typed on a Canadian French keyboard with "Canadian French" defined as the current keyboard in the operating system will
be shown in this utility as AltControlμ, not AltControlm; on this keyboard to get the utility to produce
AltControlm you will have to define the keyboard as English in the operating system.
There are various parameters that you can set to tailor how the keys appear e.g. if you want the keys to appear 30 pixels from the right-hand edge
of the image you would set "keys-align = right" and "keys-offset = 30". Click on the "Settings" tab at the left to set the parameters. You can also
change the name that appears on the button by providing the conversion in the table e.g "Backspace" becomes "Bksp".
This utitlity was originally written as a simple webpage that you could use from a modern browser (Chrome, Edge, Firefox etc...).
However there was no way to intercept browser shortcuts (like Control-n) so it was decided to convert it to a
NW.js utility instead. Unfortunately this means that there are separate versions for the different operating systems.
The utility can be downloaded for 64-bit versions of the different operating systems from the table below.
To install the utility just unzip the ZIP file. The utility can be found in the directory/folder as indicated in the table.
Please note that only the Windows version has been tested. Without a Linux and MacOS X system I have been unable to test these versions.
I'd be grateful to anyone who could test the Linux and MacOS X versions and leave their findings here:
Shotcut Forum
19. Greyscale (Luminosity) Masks
Greyscale Luminosity Masks are black and white (and various shades of grey) images. One of their uses is as masks for transitions.
When a transition is created in Shotcut by dragging one clip to partially obscure another one next to it
it is possible to assign one of these masks to that transition using the Custom option.
I have produced HTML "generators" to create fairly complex masks. They can be accessed by pressing here: